
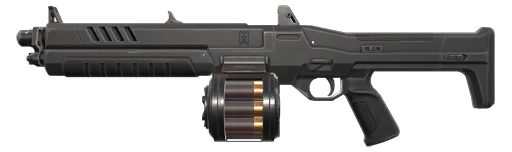
Judge
Shotguns · 1850 Credits
Weapon Stats
Damage by Range
| Range | Head | Body | Legs |
|---|---|---|---|
| 0-10m | 34 | 17 | 14.5 |
| 10-15m | 20 | 10 | 8.5 |
| 15m+ | 14 | 7 | 6 |
Shots to Kill
| Range | Head | Body | Legs |
|---|---|---|---|
| 0-10m | 3 | 6 | 7 |
| 10-15m | 5 | 10 | 12 |
| 15m+ | 8 | 15 | 17 |
| Range | Head | Body | Legs |
|---|---|---|---|
| 0-10m | 5 | 9 | 11 |
| 10-15m | 8 | 15 | 18 |
| 15m+ | 11 | 22 | 26 |
| Range | Head | Body | Legs |
|---|---|---|---|
| 0-10m | 1 | 2 | 2 |
| 10-15m | 2 | 3 | 3 |
| 15m+ | 2 | 4 | 5 |
Role & Identity
The Judge is a full-auto-feeling, pump-style shotgun that fires 12 pellets per shot and does real damage only at very close range — a shot inside 10 meters deals 34 damage per pellet to the head, enough that even a partial spread kills an unarmored target outright, but that damage nearly halves by 10-15 meters and drops to a third past 15 meters.
At 1,850 credits it sits in an odd space price-wise for a shotgun, and its identity is entirely about aggressive, close-quarters map control rather than anything resembling a mid-range weapon.
Its fire rate — 3.5 rounds per second — is fast enough that it plays closer to a semi-automatic weapon than the slower, more deliberate pump-action feel of the Bucky, which is a meaningful part of why the two shotguns are used so differently despite occupying the same broad category.
Strengths & Weaknesses
Inside its effective range, the Judge is close to unbeatable in a straight duel — a solid hit at point-blank range ends most fights instantly, and the semi-automatic-feeling fire rate (3.5 rounds per second) means a second shot is available quickly if the first spread doesn't connect fully. Low wall penetration and a hard falloff past 15 meters mean it has essentially no value outside close range, and it loses badly to anything with a working sightline before the Judge user can close distance.
The five-round magazine is generous for a shotgun and supports multiple close engagements in sequence, which is part of why it's historically been a favorite for aggressively clearing tight spaces rather than a single-peek weapon.
Because so much of its damage depends on how many of the 12 pellets actually connect, the Judge is also more forgiving of imperfect aim than a single-projectile weapon at the same range — a slightly off-target shot can still land enough pellets to kill, which isn't true of a rifle or pistol shot that misses the hitbox entirely.
Economy & When to Buy
The Judge is a specialist buy — it makes sense on maps and rounds built around close-quarters aggression, rushing a site through tight corridors, or flanking through connector rooms where fights resolve in a few meters rather than across open ground. It is a poor general-purpose economy pick since its value collapses entirely outside its short effective range.
It's most commonly bought alongside a plan, not as a default rifle substitute — a team executing a fast site take through a narrow chokepoint gets far more value from it than a player holding a long angle ever would.
It's also a genuinely strong buy specifically against a team known to be stacking a single tight entrance, since the pellet spread and fast follow-up shot both punish a group of enemies standing close together far more than a single-target weapon would.
How to Play It
The Judge rewards pushing into close range deliberately rather than waiting for a fight to come to you — pre-firing corners while moving, clearing tight rooms aggressively, and using the fast semi-auto follow-up shot to punish anyone who survives the first spread.
It's a poor choice for holding an open angle or contesting long sightlines; anyone using it effectively is thinking in terms of the next three to five meters, not the rest of the map.
Committing to the push rather than half-committing is important — backing off after a partially-connected first shot often just trades the follow-up advantage away, since the Judge's fast second shot is most of its value in a close-range exchange.
Common Matchups
At close range, the Judge beats almost everything, including rifles — a full rifle's fire rate rarely lands enough shots to out-damage a Judge blast inside 10 meters, which is exactly why shotgun rushes remain a viable tactic against a rifle-favored economy.
The matchup flips completely past 15 meters, where the Judge has almost no real damage left — any weapon with actual range, including a Sheriff or a Guardian, wins that exchange comfortably if the Judge user can't close the distance first.
Against another shotgun at close range, the Judge's faster fire rate generally gives it the edge over the slower-firing Bucky, provided both players are landing their initial shots — the follow-up matters more here than in almost any other shotgun matchup.
Map & Positioning Notes
The Judge is at its best on maps with tight connector rooms and short chokepoints — a narrow hallway or a site entrance with little open ground in front of it lets a Judge user close distance safely before the fight even starts.
On maps dominated by wide-open sites with long approach lanes, it's a much harder weapon to use effectively, since there's simply more distance to cross under fire before the Judge's damage becomes relevant at all.
It's also a strong pick for defending a site with multiple close chokepoints funneling in, since the fast follow-up shot lets a single Judge holder threaten more than one entry point in quick succession during a retake.
Want to see how your own judge usage stacks up? Compare your Valorant stats head to head, or browse every other weapon in the game.