
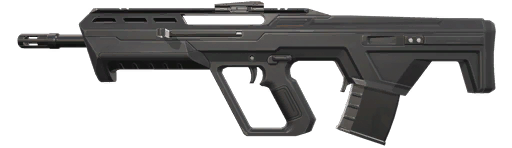
Bulldog
Assault Rifles · 2050 Credits
Weapon Stats
Damage by Range
| Range | Head | Body | Legs |
|---|---|---|---|
| 0m+ | 115.5 | 35 | 29.8 |
Shots to Kill
| Range | Head | Body | Legs |
|---|---|---|---|
| 0m+ | 1 | 3 | 4 |
| Range | Head | Body | Legs |
|---|---|---|---|
| 0m+ | 2 | 5 | 6 |
| Range | Head | Body | Legs |
|---|---|---|---|
| 0m+ | 1 | 1 | 1 |
Role & Identity
The Bulldog is the budget rifle: 2,050 credits buys real automatic rifle damage, but with a meaningfully lower headshot value (115.5, flat across its single range bracket) than either full-price rifle. It won't one-tap through a headshot the way a Vandal or Phantom will against a full-health target — a body shot plus a headshot, or two headshots in quick succession, is the realistic kill pattern.
Its defining feature is the alt-fire: aiming down sights switches the Bulldog into a 3-round burst at a much higher effective accuracy, essentially turning it into a different weapon for a moment. That gives it a genuine long-range option that most weapons in its price tier simply don't have.
That dual identity — a full-auto spray weapon at hip-fire, a burst-fire marksman weapon on ADS — makes the Bulldog one of the more mechanically distinct guns in the game, and part of why it doesn't map cleanly onto either the rifle or the pistol tier it sits between.
Strengths & Weaknesses
For 850 credits less than a full rifle, the Bulldog still gives full-auto spray capability and Medium wall penetration, which is real value on a force-buy round where the team can't afford true rifles but wants more than pistols and SMGs. The burst-fire ADS mode is a genuine tool for picking off a target at range without fully committing to the accuracy drop-off of hip-fire spray.
The lower headshot damage is the real limiter. Against an armored 150 HP target, even a clean headshot doesn't kill outright, which means the Bulldog loses straight one-tap duels against anyone holding an actual rifle. It's a weapon that wins through burst discipline and positioning, not raw one-shot potential.
The burst mode's higher accuracy also comes with a real fire-rate penalty relative to hip-fire, so a player who tries to use it as a substitute for full-auto spray at close range will generally lose that exchange — it's a tool for a specific kind of engagement, not a strictly better firing mode in every situation.
Economy & When to Buy
The Bulldog's entire reason to exist is the force-buy round — the round after a loss where full rifles aren't affordable for the whole team but going in with only sidearms feels too risky. At 2,050 it leaves more room for armor and utility than a 2,900-credit rifle would, which matters when the goal is contesting a round with a team that might actually be under-equipped too.
It's rarely the buy of choice once your economy is healthy enough for a Vandal or Phantom outright — the damage gap is large enough that a full rifle is close to strictly better whenever the credits are actually there.
It's a reasonable pick specifically for a player who plans to hold a mid-to-long angle on a force round rather than push closer range, since the burst-fire mode gives it more to offer there than it does in a chaotic close-quarters exchange against SMGs.
How to Play It
Lean on the ADS burst mode for anything past close range rather than hip-firing — the accuracy difference between hip-fire and the burst mode is large enough that treating the Bulldog like a spray weapon at 20+ meters gives up its main advantage. Short, aimed bursts land more of the burst's three rounds and get closer to that two-hit kill.
It rewards patience and pre-aiming more than the full rifles do, precisely because there is no margin for a wasted first shot the way there is with the Phantom's bigger magazine — every engagement is closer to a duel than a shootout.
Treat a missed opening burst as a signal to reposition rather than commit further — since neither firing mode one-taps a healthy target, doubling down on a bad initial read against a rifle-equipped opponent is usually a losing trade.
Common Matchups
Against a fully-bought rifle opponent, the Bulldog is at a real disadvantage in a straight one-tap contest — the correct approach is usually to force a longer exchange where the burst mode's accuracy and a follow-up shot can make up the damage difference, rather than trying to win a single-shot duel outright.
Against another force-buy loadout — SMGs, sidearms, or a mirrored Bulldog — it holds up much better, since neither side has a clean one-tap advantage and the fight comes down to positioning and who lands the first two hits.
It's a particularly strong answer to an SMG rush specifically because of its range advantage: an SMG user closing distance against a Bulldog held at mid-range is fighting uphill unless they can close to their own effective range before the Bulldog lands its shots.
Map & Positioning Notes
On maps with long, open lanes, the Bulldog's ADS burst mode earns its keep — a position that lets a player hold a mid-length corridor and burst-fire anyone who commits to crossing it plays to the weapon's actual strength rather than fighting its fire-rate disadvantage up close.
On tighter maps built around short corners and connector rooms, the case for the Bulldog weakens relative to a Spectre or Stinger, since those SMGs simply out-trade it in the close-quarters exchanges those layouts produce far more often than the Bulldog's burst mode can compensate for.
Want to see how your own bulldog usage stacks up? Compare your Valorant stats head to head, or browse every other weapon in the game.